Can't understand instructions for Waveshare LCD PWM control

OP #7425632
Rate this post
useful
not useful

Hi, I have a Waveshare LCD whose brightness I want to control by PWM. From my Raspberry PI, it has a dedicated PWM GPIO Port (the 12th port, GPIO 18: https://www.raspberrypi-spy.co.uk/2012/06/simple-guide-to-the-rpi-gpio-header-and-pins/).

(Edit: The LCD has its own power supply and is (till now) connected to the Raspberry only by HDMI. It works so far like any normal monitor.)

The instructions for the PWM control look pretty simple: https://www.waveshare.com/wiki/15.6inch_HDMI_LCD#accordion4.

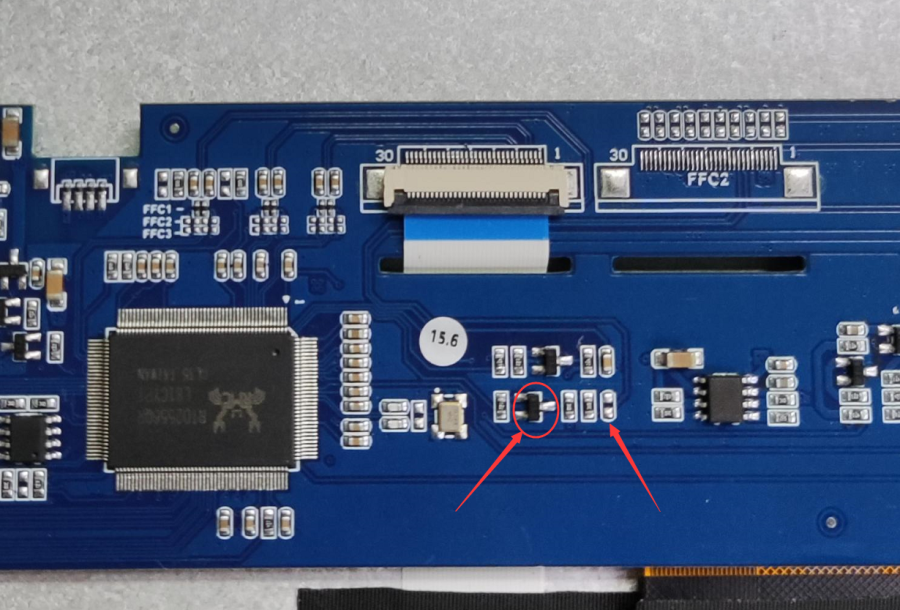
The instruction there tells to remove a triode (OK) and use the GPIO 18 port of my Raspberry. There, I don't get how that should work (I've only basic electrical knowledge). I've basically a 2nd electric circuit which overlaps with that of the LCD -- how should that work? Do I solder, like described, the lower pin of the LCD to my GPIO 18 port?

Do I have then to solder the upper pin of the LCD to a GND port of my Raspberry? So that an electric circuit gets closed? Or is that superfluous?

How does that work?
Guest #7425651
Rate this post
useful
not useful

You shall connect the pin that the arrow points to with GPIO18 of your Raspberry Pi, using a piece of wire.

I've basically a 2nd electric circuit which overlaps with that of the LCD -- how should that work?

Only you know what you have. Can't you show photos of that?

Guest #7425653
Rate this post
useful
not useful

Do I have then to solder the upper pin of the LCD to a GND port of my Raspberry? So that an electric circuit gets closed?

Of course the GND of both boards must be connected together, otherwise it cannot work. But that is not related to the modification you want to do.

First get the display working basically, then modify it. Otherwise you cannot know which step failed.

OP #7425878
Rate this post
useful
not useful

I'm still confused, I think my problem was misunderstood because my question was unclear, so I edited the original question.

Let me further explain it, by uploading the image from the linked website, about the LCD instructions.

The instructions above the image are: "Remove the triode shown in the figure below, and solder the PWM pin on the pad indicated by the arrow on the right."

The LCD is (without that soldering stuff) only connected via an HDMI cable to the Raspberry and works flawlessly (it has it's own power supply).

I'm still unsure if it's enough to solder the GPIO 18 pin of the Raspberry to only one pin on the Waveshare LCD, and how that works?

(Company: matzetronics) #7426083
Rate this post
useful
not useful

Codierer wrote:

I'm still unsure if it's enough to solder the GPIO 18 pin of the Raspberry to only one pin on the Waveshare LCD, and how that works?

Its not only one pin from the RPi you're connecting to the pad, there's also a HDMI connection from the RPi to the display. It provides the necessary grounding also for the PWM signal from the RPi to the LCD Board.

Its true that only one wire from the RPi to the indicated pad would not suffice, but the grounding's there by HDMI.

OP #7426448
Rate this post
useful
not useful

Matthias S. wrote:

Its not only one pin from the RPi you're connecting to the pad, there's also a HDMI connection from the RPi to the display. It provides the necessary grounding also for the PWM signal from the RPi to the LCD Board.

Its true that only one wire from the RPi to the indicated pad would not suffice, but the grounding's there by HDMI.

Nice, thanks for the explanation. That clears things up, always thought of the HDMI connection as something completely different, because it's a fixed standalone standard, not directly connected to the Raspberry Pi. But your explanation makes sense.

Reply

Please log in before posting.

or

Log in with Google account

Registration is free and takes only a minute.

Register now