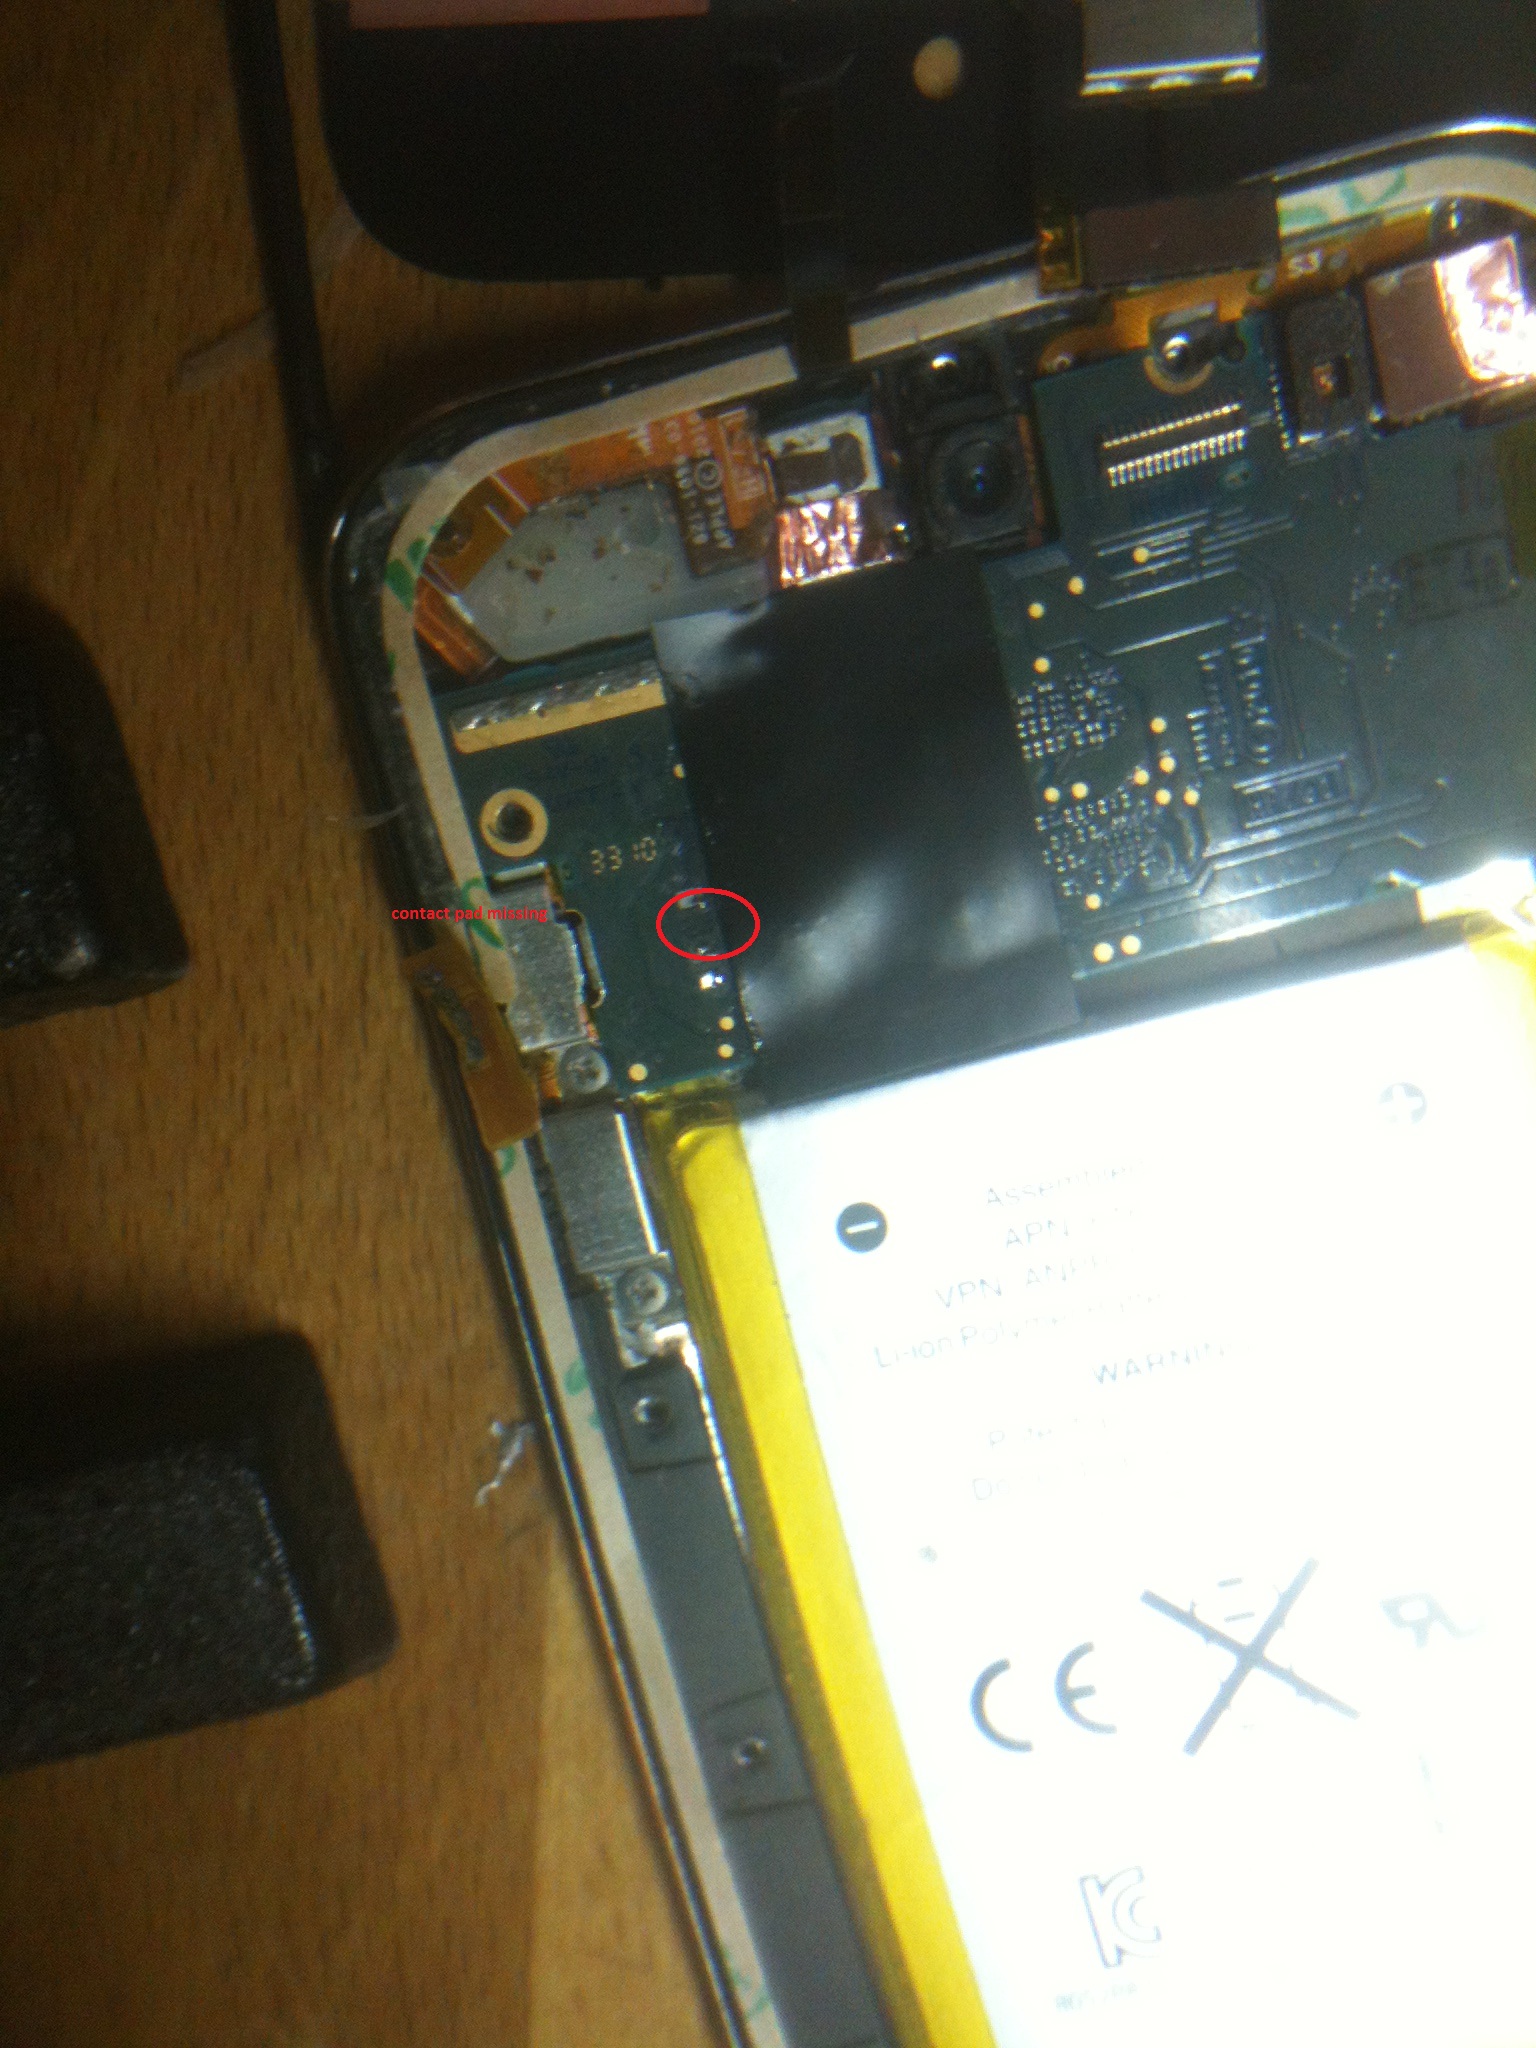
Hello,

first of all, thank you all very much for the great work you're doing
here. I have a question, hope you can help me out:

Ipod touch 4, Power ON/OFF, Volume Flex cable soldering onto logic
board.

Problem: 1 of the 4 contact pads have dissolved while soldering, can not
turn the volume UP

please refer to the picture

Question: how to fix this? There is a hair-thin line on the connector,
should I scratch off the PCB coating and try to establish a connection?
how do I fix solder on it?? Maybe sticking a piece of copper or other
metal on it (if so, what kind of glue can I use, the section is SO
small, im thinking about the sticky two sided 3M adhesive I have from
various iPhone repairs). Will I be able to solder onto the connection (I
guess it's about 0.1mm thick lol)?

thanks a lot, i'm in deep **** here, owner wants it back, friend of a
friend :((
Attached files:
You could try to remove the coating by using a glass-brush with a small
tip, or try one of those blade-knives as a desperate measure, where the
glass-brush is the preferred method. After having removed the coating,
prepare a copper wire, preferably enamel-insulated ( used in e.g. RF
coils). Apply solder to the board's trace and carefully solder the wire
to it.
Attached files:
-

contact_pad_missing_IMG_1373.jpg
810 KB -

contact_pad_missing_2.jpg
1.2 MB -

contact_pad_missing_3.jpg
1.1 MB

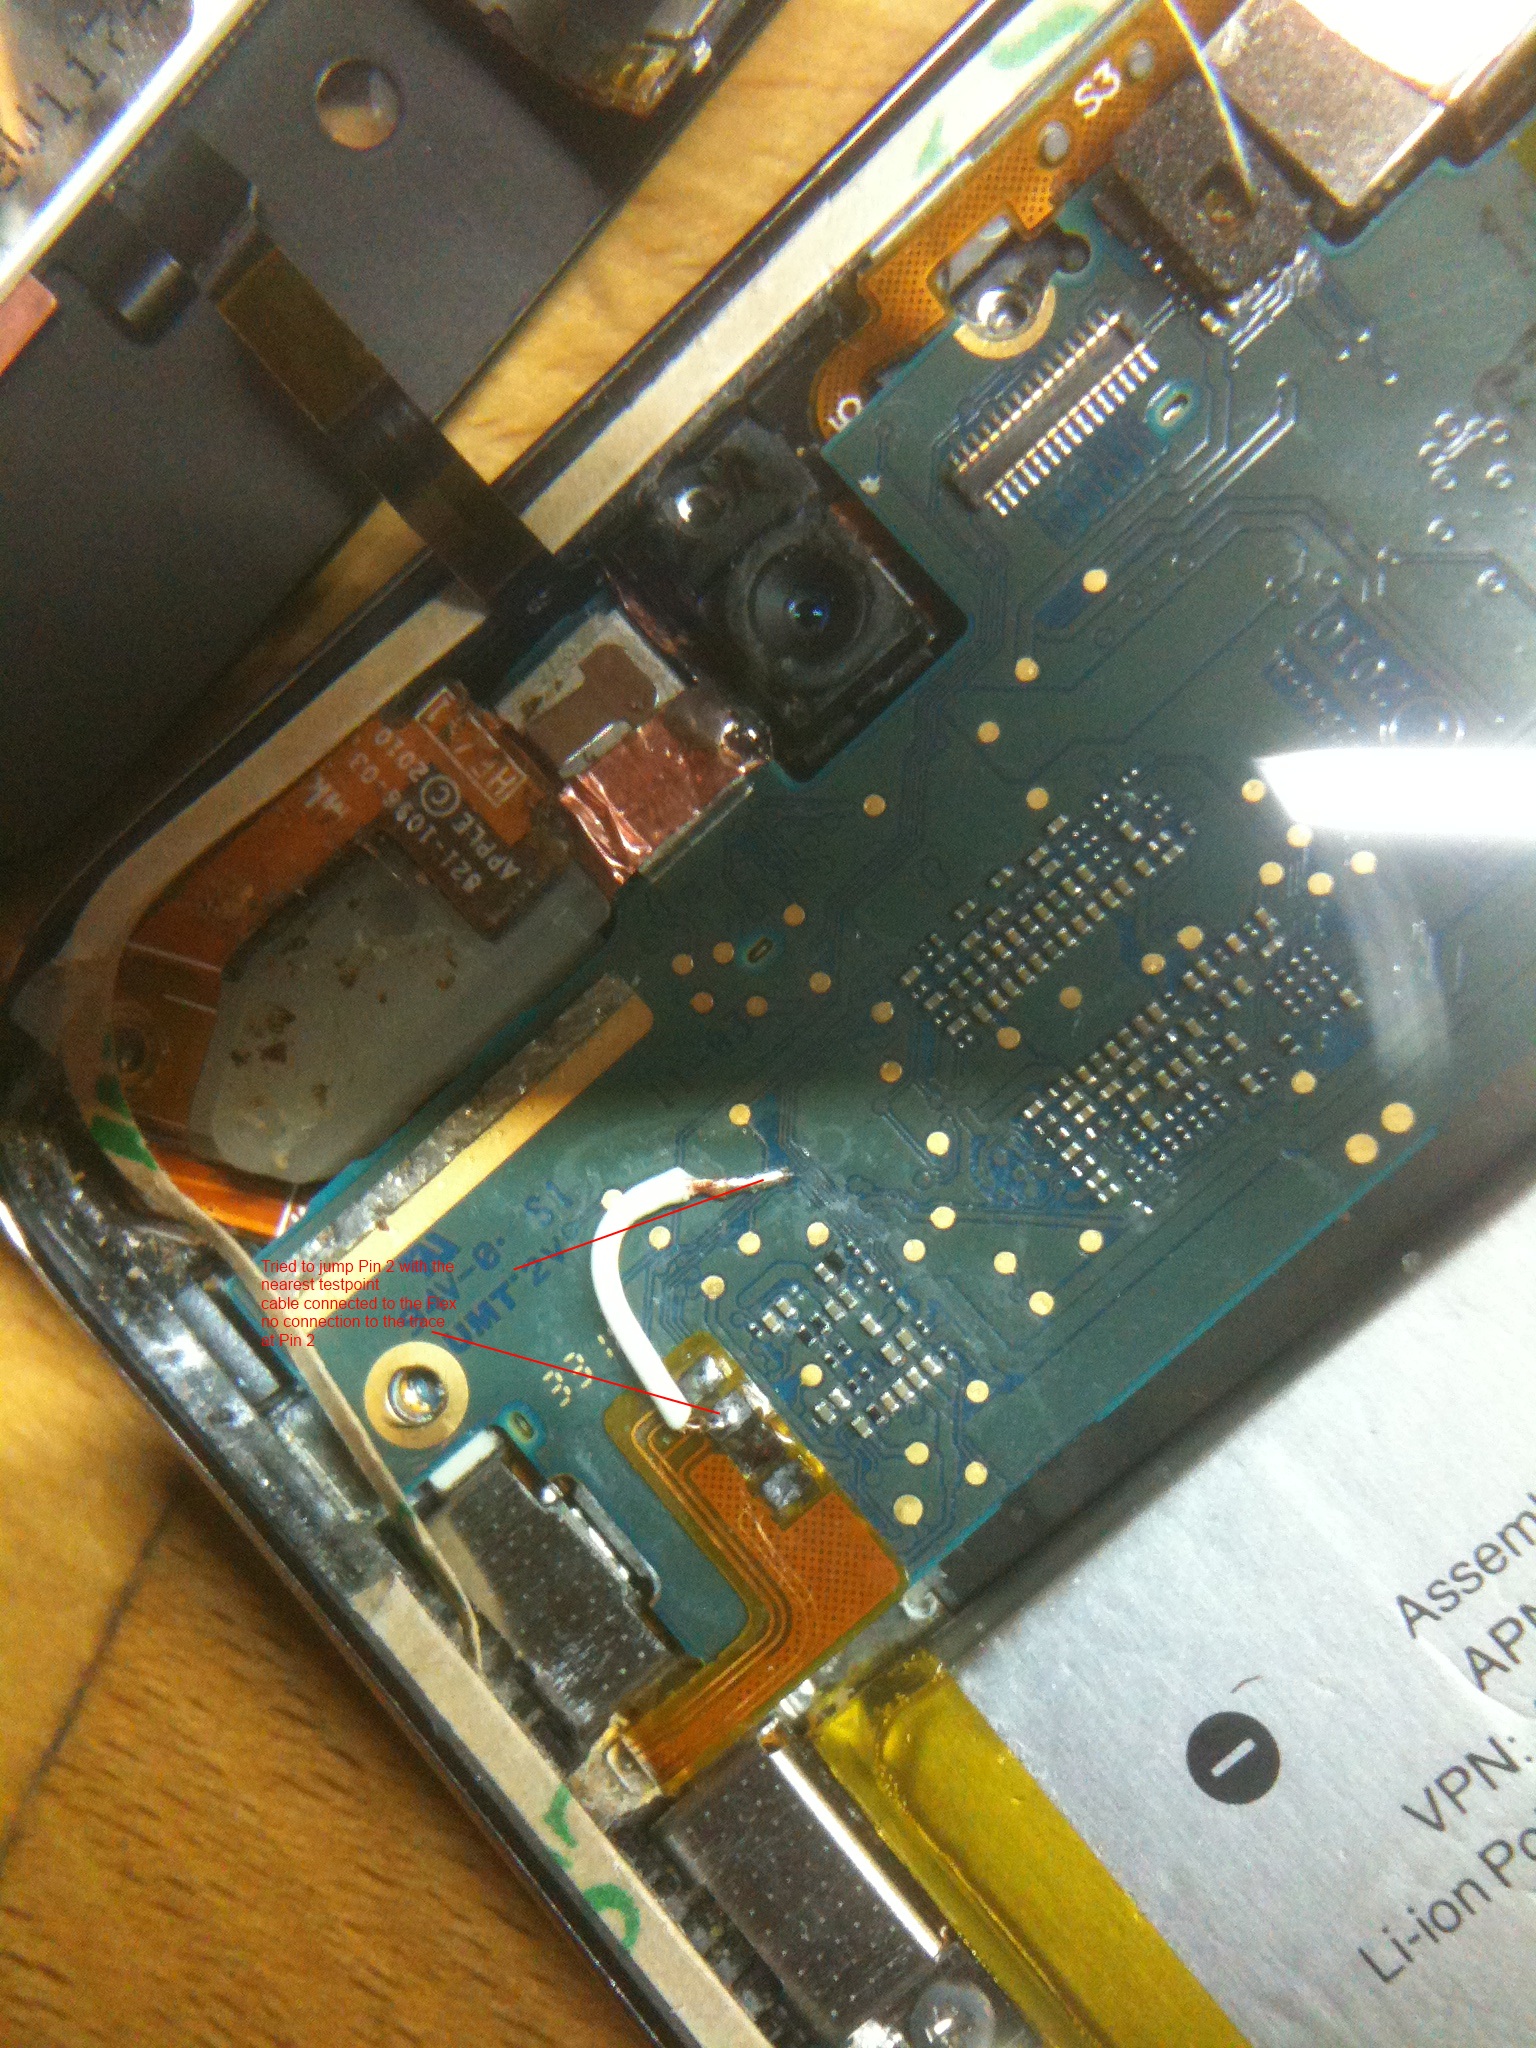
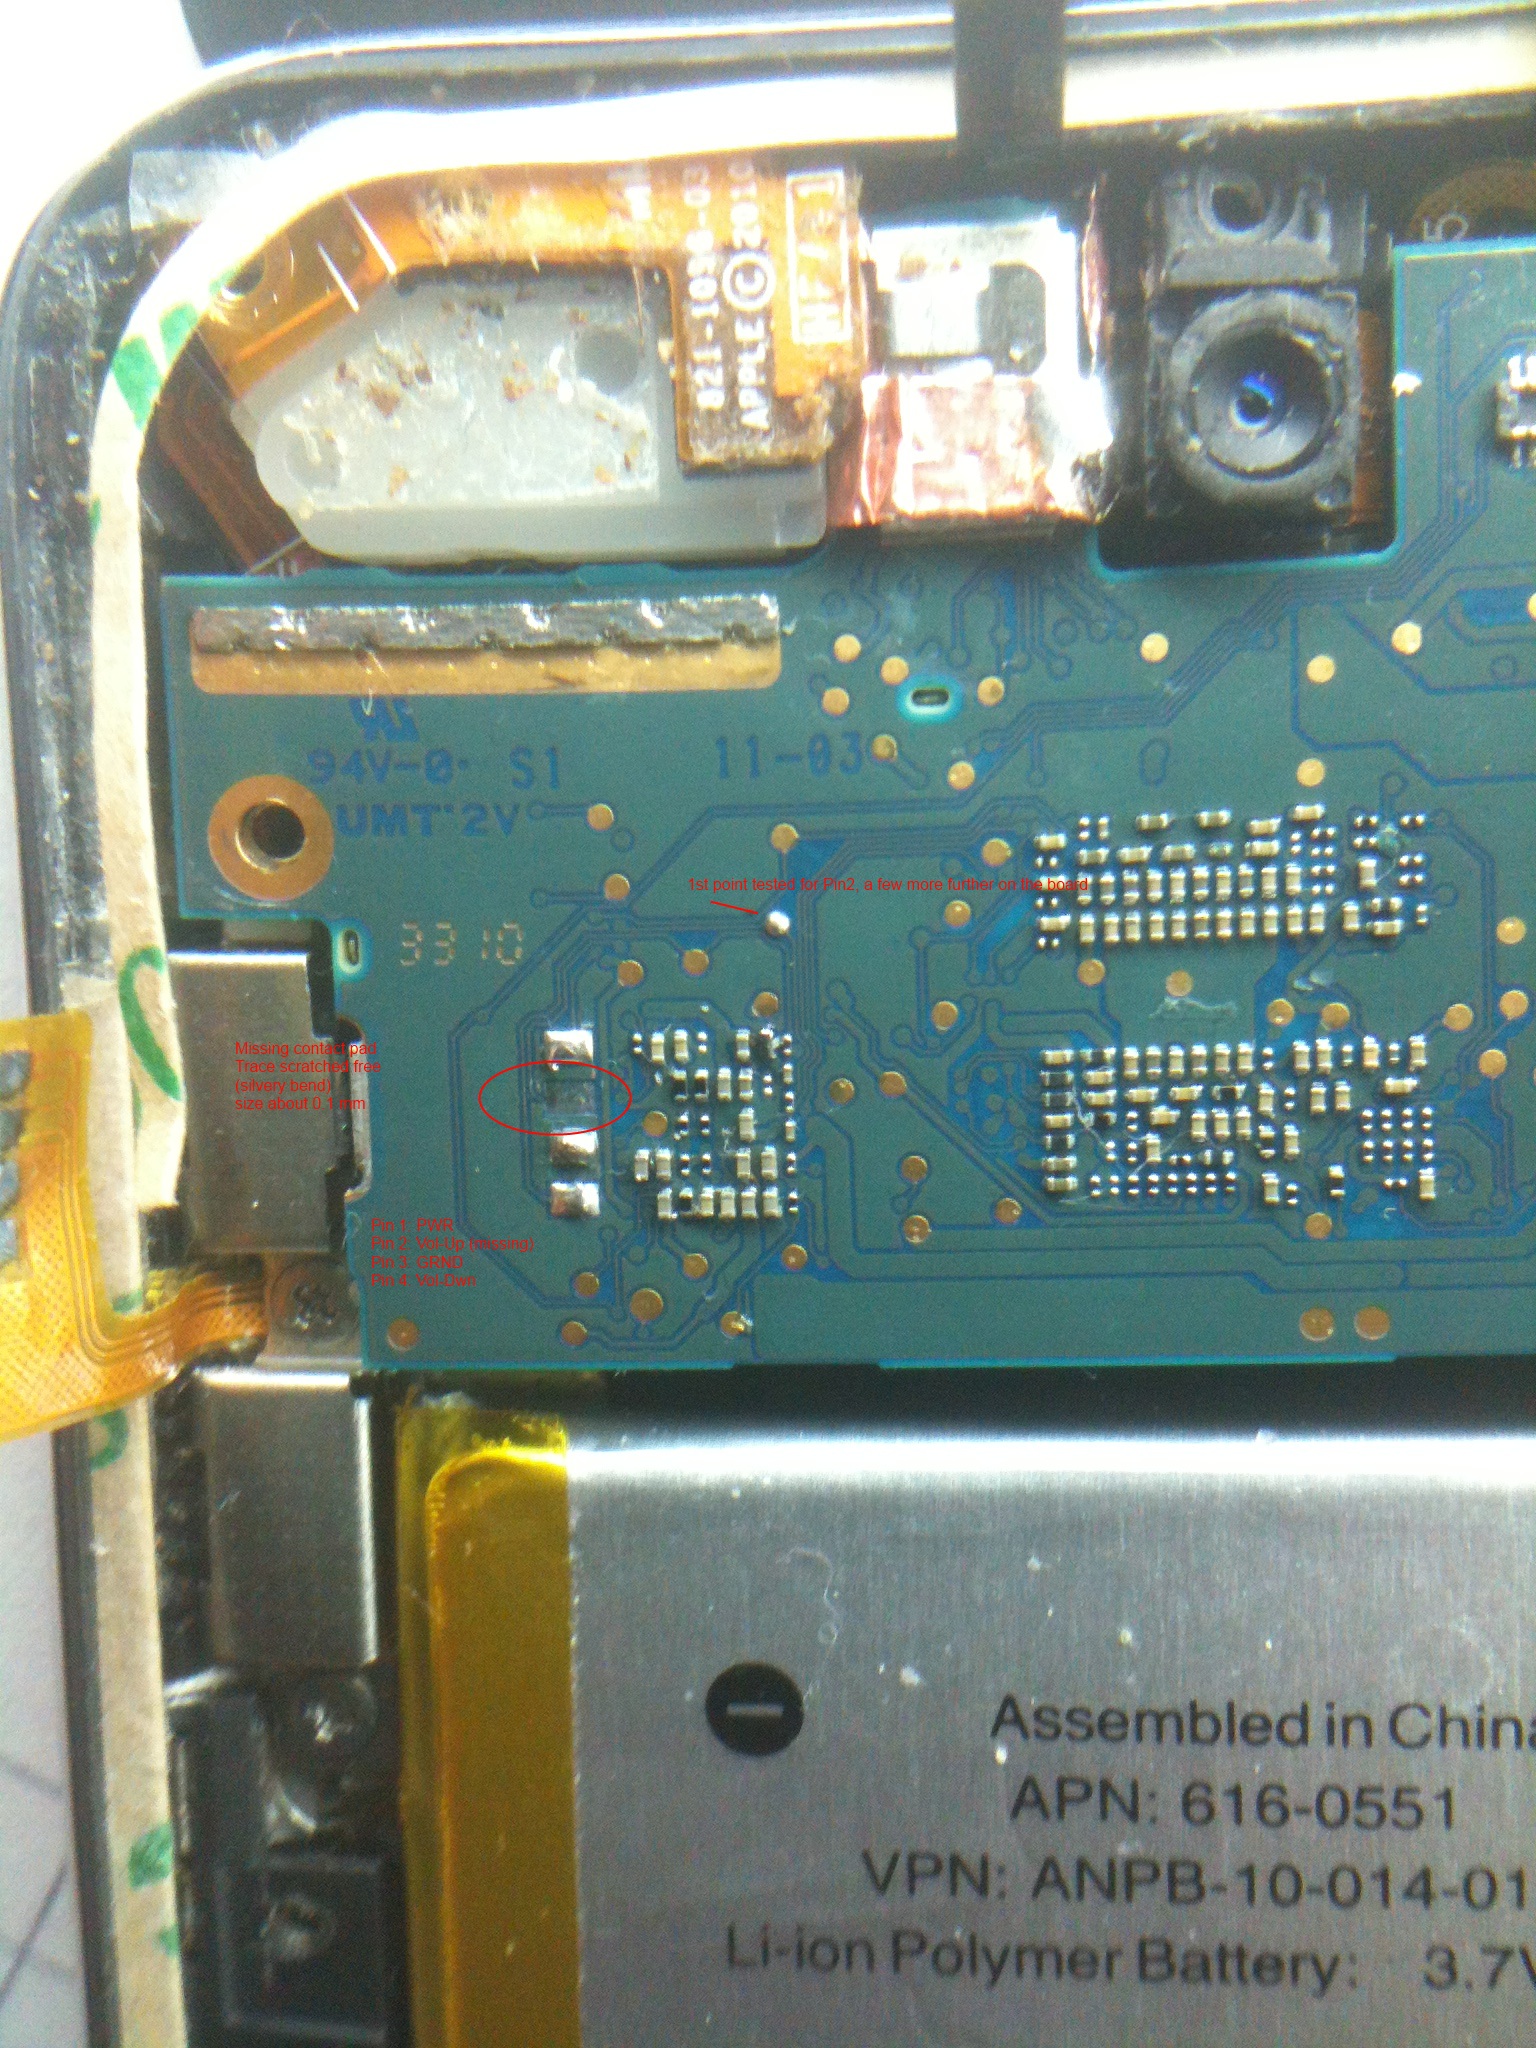
Unfortunately, my efforts so far have been in vain:

My problem: Trace is so thin I have trouble soldering anything onto it.

What I tried instead: Soldering a wire from the nearest test point that
tested positive for Pin 2 (the missing contact pad).

did not work. :P Maybe I didnt solder it right or my flex is damaged or
the wire is too thick (copper wire pulled from in-ear headphones, there
was a good connection from the two soldering points)? . Dont know if
this has anything to do with it but that testpoint also tested for pin 3
(presumably ground, pin 3 covers the whole flex and on the PCB it has no
visible trace)

Solution needed:

1. Will try to solder a wire directly to the hair thin trace again. any
pointers are much appreciated. I have 1mm solder wire (vs 0.1 mm trace,
unscratched only a small area, the location is difficult) and I'm using
a flux liquid called "Flussmittel GSP-2533RX". Do I need to buy a
smaller solderwire?

1a) will try the old fashioned way. Problem heating up the trace and
apply solder on it. The solder just sticks to my soldering tip.

1b) could try using a small thin copper tape, solder some solder on it
and try to "stick" it on hoping that the trace will connect. what do you
think?

2. How about conductive varnish?
http://www.conrad.de/ce/de/product/241319/SILBERLEITLACK/SHOP_AREA_17036&promotionareaSearchDetail=005"]http://www.conrad.de/ce/de/product/241319/SILBERLEITLACK/SHOP_AREA_17036&promotionareaSearchDetail=005

Will this work? I could stick a copper sheet on there OR just try to
solder onto the varnish?  but will the varnish stick on the PCB? And can
I use a toothpick or sth similar PRECISE to apply it?

3. any other suggestions?

thanks a lot for your help, I'm really desperate I DO NEED THIS TO WORK
:((((((((


see pictures
if you follow the trace on the 3rd picture, it leads to a small circular
pad, where you could try to brush the green coating away (i hope you
have that glass brush handy). Remove the coating until you see the
copper nice and clear and put a tiny drop of your 'Flussmittel' to it.
Now use a small wire of the 0.15mm type (enamel insulated) from e.g. a
transformer or a coil. Apply heat first to the wire, removing the enamel
and apply solder to it, basically as if you would use it in wire-wrap
techniques.
Apply a little solder to the pad on the board and solder the wire to it
using tweezers to precisely position it. Use adhesive tape to fix the
wire there while making the connection on the other side of the wire.
Conductive silver is nice but won't help here, as it will not stand in
place.
Its very useful to repair rubber-type push buttons and similar, though.

Good luck!
Attached files:
-

contact_pad_missing_4.jpg
1.1 MB
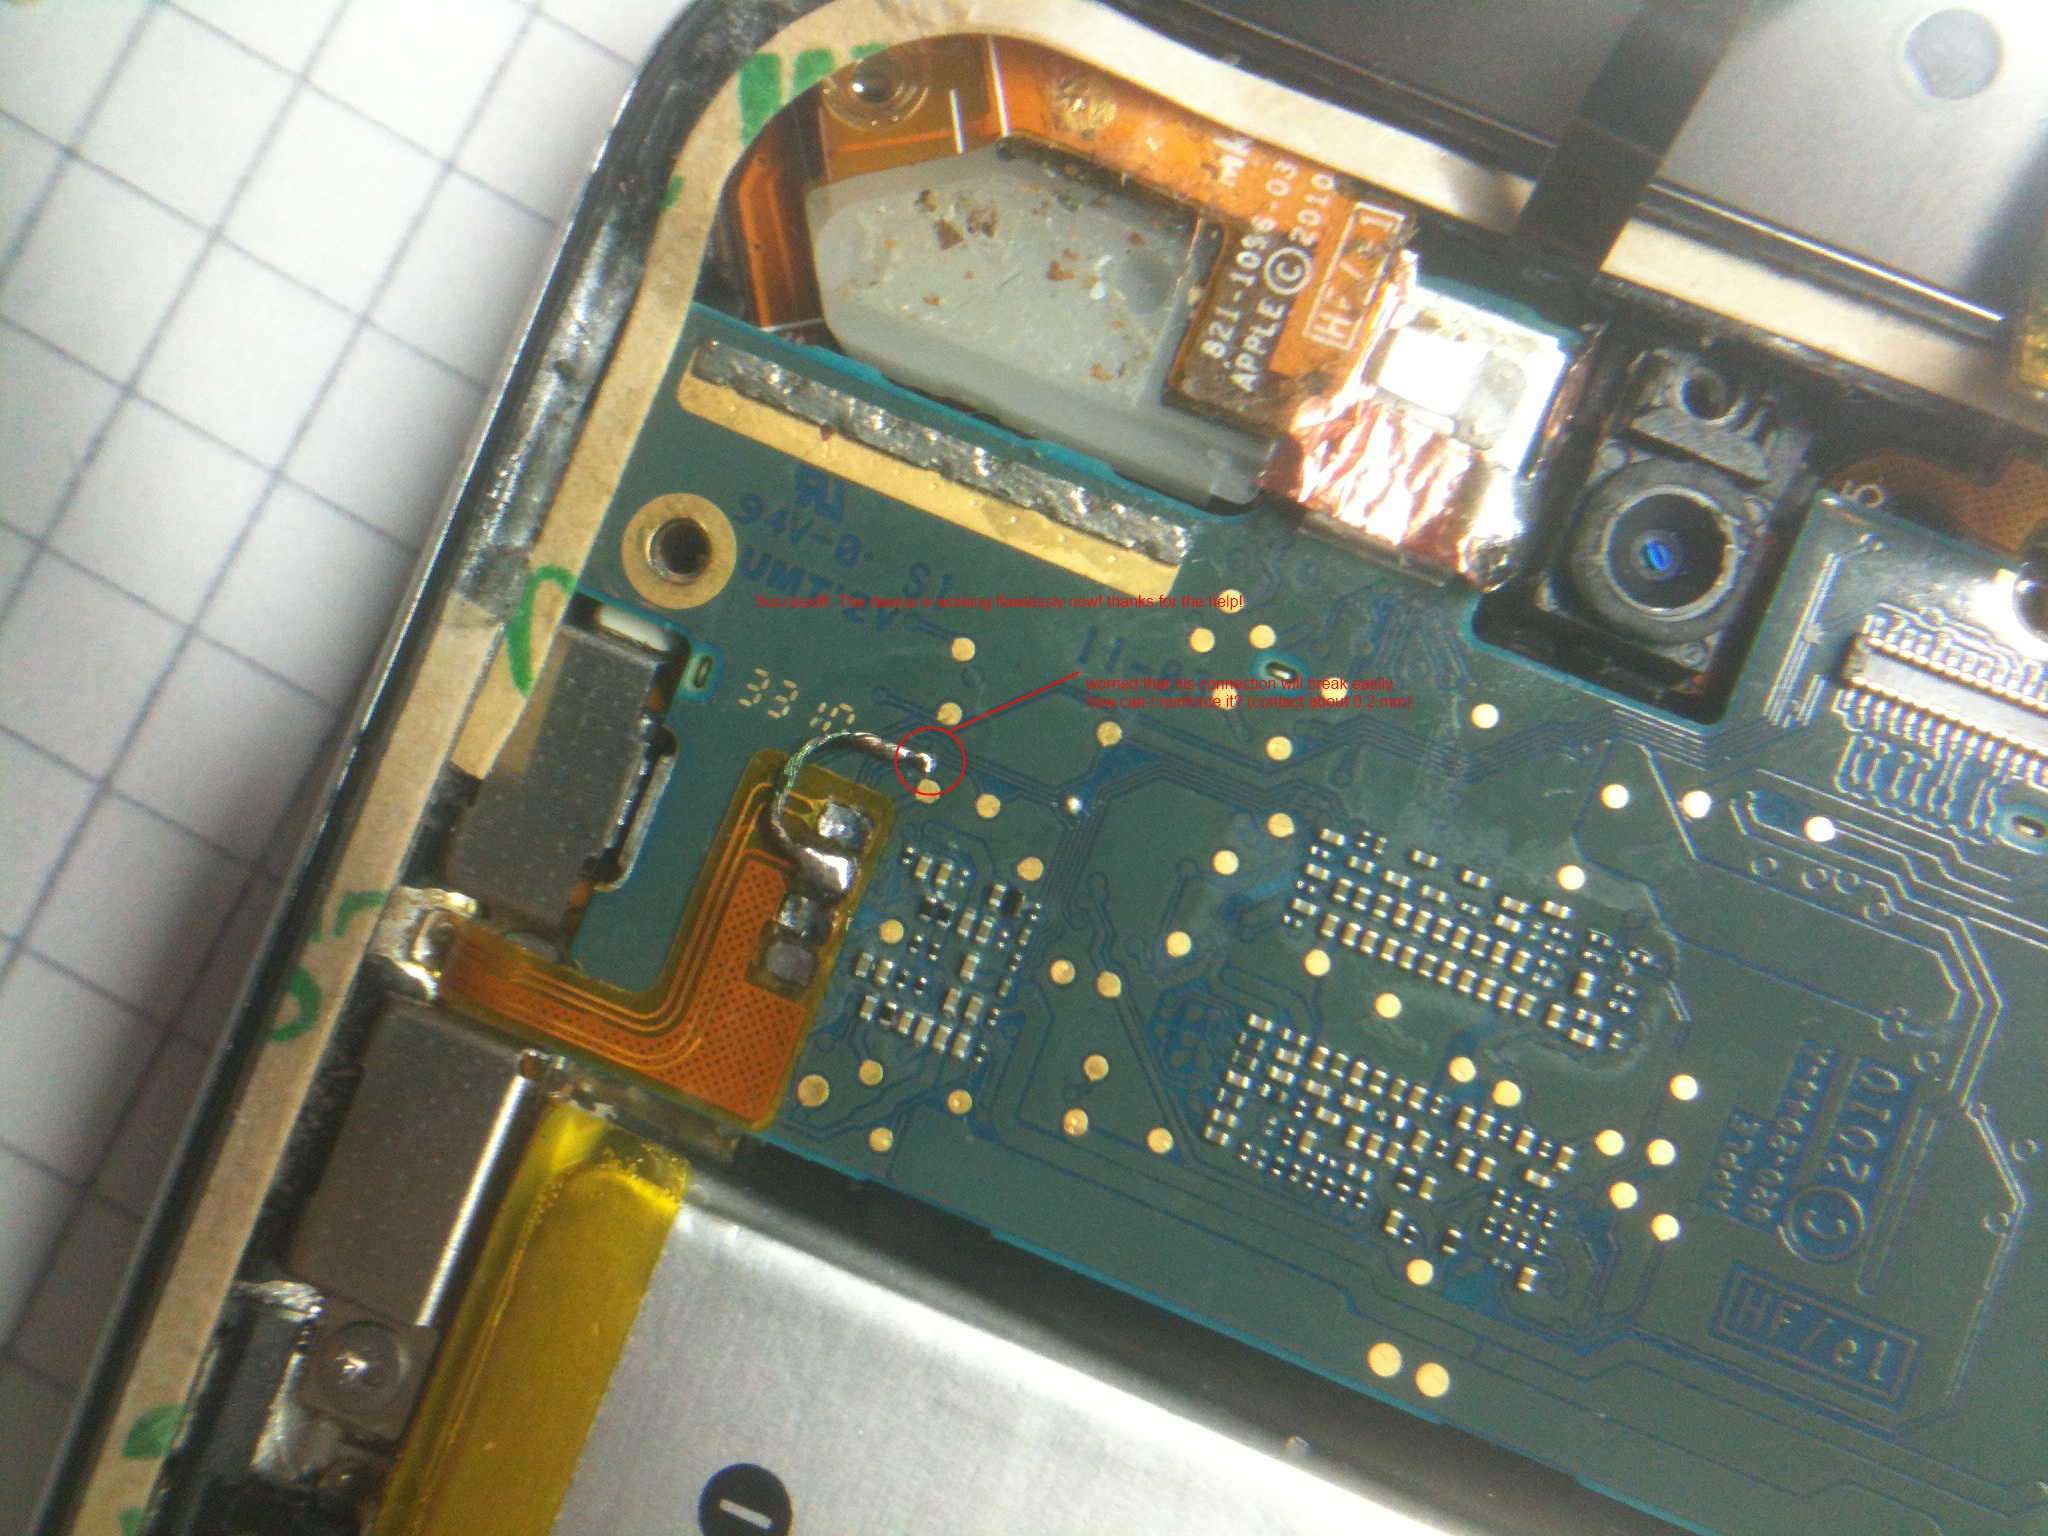
ok, apparently the new flex was faulty!! Thanks for your help Matthias!!

i got a new flex and jumped it to the small circular pad and IT'S
WORKING. BUT due to the small space i fear it wont survive a few drops
to the ground.

ive been thinking to apply a little hot glue, only on the soldered patch
around the circle to avoid adding too much weight, what do you think?

ideally i can press the emi shield onto it before it gets cold..  but
still it's not a very good solution...
viskjall wrote:

> ive been thinking to apply a little hot glue, only on the soldered patch
> around the circle to avoid adding too much weight, what do you think?
Yeah, sure anything which reduces load on the wire is well worth it. I
suggested adhesive tape, but hot glue probably is even better.
what a glass-brush
Hey guys new to the forum  I have a similar problem to visktall's but
instead of the volume up tab my power tab broke off. I would try the
wire jump trick but not sure where the circuit pad for the power is. Can
anyone help and point it out? It would be greatly appreciated  I could
try to solder to the trace but if someone knows where the circuit pad is
located that might be eaiser.  Thanks very much
Thomas did you ever figure out where to connect to for the missing power
contact point? I was just replacing my power/volume wire and my power
contact came right off when desoldering the wire.
No idea if you guys would even get a notification of this.

Normally, I would not feel inclined to reply, I would simply take the
info and go about my merry way.

However, this thread saved my day.

Today I was attempting to swap out an xbox 360 optical drive for a
client. Relatively simply procedure. In the process, you must swap out
controller boards. There are four control wires soldered on this board.
Super simple to remove, basic soldering. I assume my soldering iron was
too hot, because in the process one of the contact pads broke off.
F***!!!!!! In desperate frantic I've been googling how to fix this. Not
entirely sure that it was actually even called a contact pad. Without
this specific wire, the optical tray would simply open and close in an
endless loop... lol.

I found this thread. Figuring, if it doesn't work for me, I couldn't
stand to lose anymore than I have already, I tried. Somewhat
differently... I took a micro flat head screw driver, I followed the
trace and scrapped away the PCB until the copper contact was complete
exposed. Applied an EXTREMELY light layer of solder to the exposed
trace, soldered wire flush with the trace.

BAM!!! IT WORKS!!!!

Not exactly what you guys were discussing, but enough to get me
thinking.

As relatively unrelated my issue was... thanks for having this thread?

:D
Hi

Well, soldering can be easy if you know the basics before soldering.Here
is a guide for component placement:
http://aa-pcbassembly.com/design-insights/guidelines-component-placement/

Cheers!
For anyone looking for answers to the original problem I agree that
often the answer is to connect to the stub of the track that led to the
missing pad, but another method that worked for me years ago was silver
conductive paint or adhesive.

You can either use the adhesive to make the connection or with some
types of adhesive and a low temperature iron you can solder to the
adhesive if you are quick.
Please log in before posting. Registration is free and takes only a minute.
Existing account
Do you have a Google/GoogleMail account? No registration required!
Log in with Google account
Log in with Google account
No account? Register here.