-
Article
ESP8266
zueinander aufbauen. Das Feature nennt sich AP-Isolation. Produktbeschreibung: Pinbelegung einiger ESP8266-Module. ESP8266-01. Quelle . ESP8266-07. Achtung, beim ESP8266-07-Modul sind einige mit vertauschten Beschriftungen von GPIO4 und GPIO5 unterwegs . ESP8266-12E. Das ESP12E-Modul gehört vermutlich
SDK-Beispiele (IoT,AT) entsprechend der offiziellen Anleitung kompilieren, flashen und läuft es? Links. ESP8266-Eintrag auf en.wikipedia.org ESP8266-Community-Forum ESP8266 Github mit Wiki und Source-Code-Beispielen Hackaday-Posts zu ESP8266 ESP8266-Seite des Herstellers ESP8266-Forum des Herstellers ESP8266
-
Article
ESP8266-CPCB
Stepdown, LDO, USB inkl. USB UART, ... Multiple VCC3V3-Pins als quasi-separate Spannungsquellen auf ESP8266-PCB benutzen -> Nur wenig VCC3v3-Routing auf ESP8266-PCB Für Platzierung und Bestückung des ESP8266 Unterhalb des ESP8266: Kein Stopplack, kein Kupfer Um ESP8266 rings herum Stopplack und Kupferbahnen nur herangeführt Platzierung aufgrund der Senke (kein Stopplack) Großes Via unter ESP8266; Via-Ring abhobeln,damit ESP8266 flach liegt; Nachträglich verlöten von Rückseite GND des Spannungswandlers separat hereinführen Ground-Vias beim Antennenpad, möglichst kurze Distanz von ESP8266
-
Thread
ESP8266 "calling home"
use in Wireshark. My device is an ESP8266 coupled with an I2C BH1750 light sensor. The ESP8266 contains portions of the „ESP8266AdvancedWebserver“ example of the Aruino IDE (1.6.4) plugin, which was installed through the board-manager.
to check if your ESP8266 is calling home as well. You just need to check the routing table of your router. Please post if your ESP8266 connects to "alien" servers as well. Positive/negative reports are welcome. I
-
Article
-
Article
ESP8266 nodeMCU Lua
ESP8266 nodeMCU-Boards in Lua programmieren:. === Dieser Artikel handelt von Microcontroller-Boards die auf den ESP8266-Modulen basieren und als Firmware ausschließlich nodeMCU / Lua nutzen. Das heißt es soll ausschließlich um die Programmierung in der Scriptsprache Lua gehen. Wer den ESP8266-Module mit Arduino-IDE oder irgendwie anders programmieren möchte möge sich auf die Seiten begeben die sich damit beschäftigen. Dieses Wiki ist ausschließlich und exklusiv für die Lua-Programmierung
-
 Image
Image
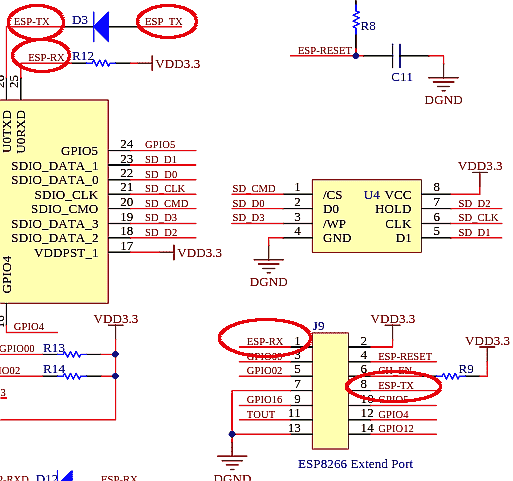
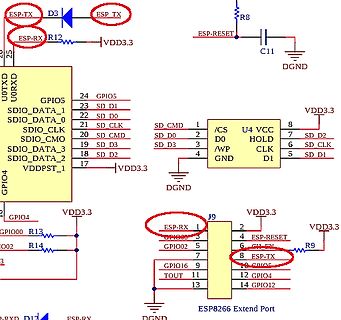
Schaltplan eines ESP8266 Extend Ports
ESP-TX, D3, ESP-RX, R12, VDD3.3, ESP-RESET, C11, DGND, U0TXD, U0RXD, GPIO5, SDIO_DATA_1, SDIO_DATA_0, SDIO_CLK, SD_CMD, SDIO_DATA_3, SDIO_DATA_2, SD D1, SD D0, SD_CMD, SD D3, SD D2, U4, VCC, SD D2, /CS,
-
Thread
ESP8266 RGB LED Strip Controller
which is already being developed in my free time. For the WiFi module I want to use the infamous ESP8266 board, namely an ESP-07 (http://www.banggood.com/ESP8266-ESP-07-Remote-Serial-Port-WIFI-Transceiver-Wireless-Module-p-968191.html). The plan is to flash it with nodemcu (http://nodemcu.com/index_en.html
that I want to use transistors or MOSFETs to drive the LED Strips 12v using the 3.3v logic of the ESP8266. From what I know, I should choose a FET that can be switched fast (requirement for PWM) and has a maximum gate threshold voltage below 3.3 Volts. Based on these requirements and the availability
-
Thread
Custom ESP8266 Board unable to connect
Hello there I have made a custom ESP8266 board with which I want to operate WS2812 LEDs with WLED. I have received and assembled the PCBs and wanted to upload the blink sketch for testing with the Arduino IDE. However, I get an error
the flash memory. See http://stefanfrings.de/esp8266/index.html Notice the "translate" link in the upper right corner.
-
 Image
Image
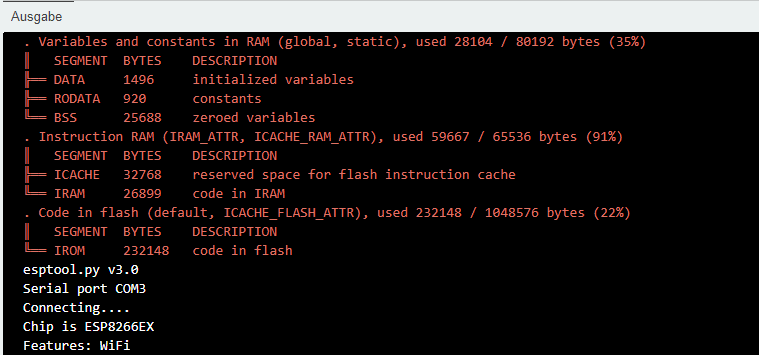
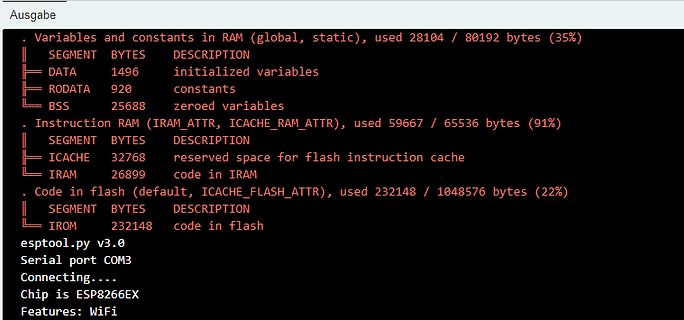
Speicherbelegung und Chip-Informationen ESP8266EX
bytes (22%) |-- IROM 232148 code in flash esptool.py v3.0 Serial port COM3 Connecting.... Chip is ESP8266EX Features: WiFi
-
 Image
Image
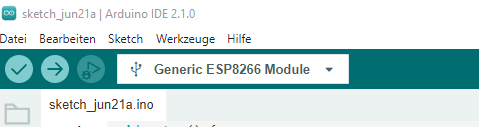
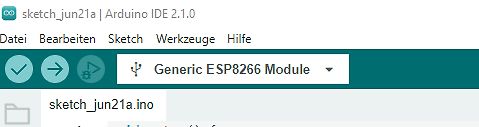
Ausschnitt der Arduino IDE mit ESP8266 Auswahl
sketch_jun21a | Arduino IDE 2.1.0 Datei Bearbeiten Sketch Werkzeuge Hilfe Generic ESP8266 Module sketch_jun21a.ino
-
Thread
NodmCU ESP8266 not to flash
I have tried everything under different operating systems and with various USB cables. I even bought a super-short USB data cable especially for this purpose. The error message reads: ‘Failed to connect to Espressif device: Timeout waiting for packet header’. Pressing the boot or rst button did not help either. I am completely at a loss. Even the trick with the 10 my Elko was unsuccessful.
-
Article
Datei:ESP8266-PinBelegung2.jpg
ESP8266-Pinbelegung - Klein mit Keramik-Antenne
-
Article
Datei:ESP8266-PinBelegung1.jpg
ESP8266-PinBelegung -- Groß mit PCB-Antenne (von Bestückungsseite aus gesehen)
-
Thread
Problems with ESP8266, IRF510N and circuitboards
Good evening. I encountered some problems during my Project with the ESP 8266 in combination with the IRF510N on a circuit board. I wanted to build an RGB controller for common anode RGB LED strips. The project and the code are done, and I tested the whole project on my
ESP module operates on. The more important test was to check whether there is a voltage drop between the GND pin of your ESP8266 and the source pins of your transistors. You did not answer this question
-
Article
Datei:WC24h-ESP8266-ESP-01.png
Anschlussbelegung ESP8266-ESP-01
-
Article
Datei:Wordclock24h-Web-ESP8266-SPIFFS.png
Version 2.8.0
-
Thread
Reverse phase control / trailing edge dimmer with Arduino / ESP8266
I want to build a trailing edge control / reverse phase control dimmer controlled by Arduino or ESP8266. The dimmer is mainly meant for dimming electronic transformers for 12V AC halogen lamps (example http://www.osram.com/osram_com/products/electronics/electronic-control-gears-for-traditional-lighting
German Translation: Wie der Titel schon sagt möchte ich einen PhasenABschnittdimmer mit dem ESP8266 realisieren. Ziel ist die dimmung von elektronischen NV Halogen Trafos (die Trafos sind explizit nur für PhasenABschnittdimmung geeignet und werden derzeit mit ELV DI22-2 gedimmt). Hierzu habe
-
Thread
PCB w/ ESP8266 NodeMCU - Multiple SPI modules not working
Hello, I've been working on a project for quite a while now, which involves the ESP8266 NodeMCU (v1.0), as well as two SPI Modules: ENC28J60, and RFID-RC522. With that being said, I encountered a problem recently, which I haven't been able to resolve so far. Working with micro-controllers
Hey T, thanks for the reply. yes, the SDA_RFID pin is the D0 pin on the ESP, which is configured as an output pin. It is passed to the RFID-lib I am using (called MFRC522) as slave-select. best regards, Ed
-
Thread
How to adjust WiFi-channel for ESP-NOW
wie der der mit dem WiFi-Router verwendet wird. Ich habe aber nichts darüber gefunden wie man bei ESP-NOW fr ESP8266 den Kanal einstellt. Bei ESP32 wird eine andere Library benutzt. Deswegen kann man die Erkenntnisse von ESP32 nicht auf ESP8266 übertragen. Jedenfalls nicht alle. Weiß jemand wie man bei ESP8266 den ESP-NOW-Kanal einstellen kann? viele Grüße Stefan
-
Article
WordClock mit WS2812
Modul Anschlüsse Nucleo-Board: ESP8266 GND an GND ESP8266 VCC an externe 3,3V (Vorsicht: Modul zieht bis zu 200mA!) ESP8266 CH_PD an PA6 ESP8266 RST an PA7 ESP8266 GPIO0 an PA4 (NEU!) ESP8266 TXD an USART6 RX (PA12) ESP8266 RXD an USART6 TX (PA11) Anschlüsse BluePill: ESP8266 GND an GND ESP8266 VCC an externe 3,3V (Vorsicht: Modul zieht bis zu 200mA!) ESP8266 CH_PD an PA1 ESP8266 RST an PA0 ESP8266 GPIO0 an PA4 ESP8266 GPIO2 via 10k an externe 3,3V ESP8266 TXD an USART2
-
Thread
ATmega328 + ESP-01s low power brainstorm
outside of these hours. \*\*\* I suppose an even better approach would be to use a variant of the ESP8266 that has more pins available but I already have three ESP-01s so I'd like to stick with them now.
first step to save power is to reduce the chip count. Reading the sensor can be done with an ESP8266, so you can save the arduino board completely. Deep sleep the ESP8266 https://www.esp8266.com/wiki/doku.php?id=esp8266_power_usage and you achieved your goal.
-
Thread
ESP-07 AT commands not working, programming works though
Peter K. wrote in post #6816079: > How can I get AT commands to work with the ESP-07? https://translate.google.com/translate?hl=en&sl=de&tl=en&u=http%3A%2F%2Fstefanfrings.de%2Fesp8266%2F
One more think to check: The ESP-07 modules do not have a capactor at the reset pin, and also no pull-up resistor. See the schematics details on http://stefanfrings.de/esp8266/index.html#esp12 Can you start them by issuing an
-
Thread
Set callback to validate a server certificate // security protocol used in a HTTP GET request
Hello altogether, I am trying to program an ESP8266 with the Arduino IDE. By the help of https://randomnerdtutorials.com/esp8266-nodemcu-http-get-post-arduino/ I created a so called sketch which sends a HTTP GET request to a WebService running on
, but may require a certificate as parameter of [c] begin(); [/c] (Source: https://github.com/esp8266/Arduino/blob/5d2563eee98ae116dc3d4b6bc14225efb3c85098/libraries/ESP8266HTTPClient/src/ESP8266HTTPClient.h#L153) Is it possible to set ServerCertificateValidationCallback and the SecurityProtocol
-
Article
UClock
zur STM32-Firmware eingespielt wird! Ältere ESP8266-Firmware-Versionen führen auf jeden Fall zu Fehlverhalten! Regel ist dabei: Die STM32-Version A.B.C muss mit der ESP8266-Firmware in den ersten beiden Ziffern A.B übereinstimmen, die dritte Ziffer
: Bin-Datei für ESP8266 ESP-12F:
-
Article
Übersicht Funkmodule
im Vergleich zu kabelgebundenen Übertragungen, entspricht jedoch lediglich 1/8 typischer WLAN-ICs (ESP8266). ESP8266. Das WLAN-Modul kann sowohl Client als auch AP sein. Damals hat der Release einen starken Hype ausgelöst und dementsprechend ist die Community rasant gewachsen, wodurch sich sogar ein
Verfügung gestellt, es gibt aber auch eine Port vom GCC und selbst in die Arduino Umgebung ist der ESP8266 mittlerweile eingepflegt. ESP8266 MicroPython NodeMCU LUA Interpreter Website NodeMCU Firmware Arduino ESP8266 EMW3162. HackADay Eintrag Datasheet Links. Thread zum Artikel (Fragen, Anregungen etc
-
Article
Tutorial - Aufbau WordClock mit WS2812
dem STM Nucleo Board leuchtet -> rote LED auf dem ESP 12 Modul leuchtet -> rote LED auf dem AMS1117 / Spannungsregler leuchtet -> Software "esp8266_flasher.exe" starten -> Bin Button betätigen => ESP Word Clock-4M.bin anwählen und öffnen -> richtiges Port
-> User Taster nach 2 sek. loslassen -> Download Button betätigen=> connected -> blaue LED auf dem ESP Modul 12 blinkt -> der Übertragungsstatus wird im Programm "esp8266_flasher.exe" angezeigt -> nach einigen Sekunden -> blaue LED des ESP Moduls 12 ist aus -> Im "esp8266_flasher.exe" wird angezeigt:
-
Thread
MCU with WiFi and GREAT ADCs
breakout board for <15€. I would use an esp32/8266 with an external ADC (breakout board if you want to), also because the Wlan could disturb the ADC measurements and add noise.
somethign available > but most likely not available on a breakout board for <15€. > > I would use an esp32/8266 with an external ADC (breakout board if you > want to), also because the Wlan could disturb the ADC measurements and > add noise. What if I told you the price is not a problem? Any MCUs
-
Thread
Manipulation of json
Sorry forget the information...it's in esp8266 code I need this in an Arduino code..
schrieb im Beitrag #7240898: > https://stedolan.github.io/jq/manual/ I guess that won't run on an esp8266. But anyway, here is an example for sh: [code] echo [[2,3],[5,6]] | jq -c [.[],[7,8]] [/code]
-
Article
ESP32
Der ESP32 ist ein WLAN-SoC (System On Chip). Der Nachfolger des beliebten ESP8266 vereint zwei 32 Bit CPU-Kerne mit Floating Point- und DSP-Funktionen, sowie Unterstützung für bis zu 8 MB RAM, mit Bluetooth
Espressif IoT Development Framework ist ein auf FreeRTOS und lwIP basiertes Entwicklungssystem für den ESP32. Projekt auf GitHub Diskussion über Espressif IoT Development Framework im Forum Beiträge zu ESP32 und ESP8266 im Forum
-
Thread
Curl Arduino nano
information by HTTP-Put into the cloud/on a RasPi/HomeServer/NAS/... However those examples tend to use a ESP8266 (or to run on the ESP8266 entirely), because with that Wifi module TCP/IP is already taken care of. Not sure how you want to use HTTP over nRF24, you have a second Arduino with another nRF24-
-
Article
Wanderkiste (Widlar)
10xxx 22.01.2024 07.02.2024 02038150017171 Hermes 18,3kg B: Orange Pi Zero, PY32F00x, STM32F030K6, ESP8266 Module ESP-01/12, SMD Speicherdrosseln, SMD (Power)LEDs, ENC28J60 Module 4 Benedikt M. Süd-DE 10.02.2024 12.02.2024 02043127007598 Hermes, 20.2 kg S: Orange Pi, Pi Pico, SMD 0805; B: W&T Quad-ComServer
ein defektes Gerät), Messtechnik, Interessante Bauteile THT/SMD... B: Marsboard (ähnl. Raspberry), ESP8266, ESP32, Laserdiode (rot), TI Robo Eval, wenn von Interesse ATX NT, LC Displays ... 4 A.M. 081xx xx.xx.2026 xx.xx.2026 S: EvalBoards, Lasermodule B: EvalBoards 5 464xx - Köln xx.xx.2026 xx.xx.2026
-
Thread
Wordclock stopped working
current eeprom version: 0x00000000 updating EEPROM to version 0x00020900... done DFPLAYER LOGGER ESP8266 LOGGER read rtc: Su 2000-01-01 00:00:13 read rtc: Su 2000-01-01 00:00:13 DFPlayer: SD card online DFPlayer: query software version DFPlayer: Version 0008 DFPlayer: set source device: 2 DFPlayer: set eq 0 DFPlayer: set volume 0 DFPlayer is up dfplayer is online esp8266 now up (- setup UDP) (- local port: 2421) (- setup server UDP) (- local port: 2424) (FIRMWARE 2.9.5) (- tables found; wc12h-tables-en2.txt) (- check tables successful) --> tabinfo<0d><0a
-
Article
PIC18F Testboard
Betriebsspannung einstellbar 3.3V/5V Seriell/USB-Wandler MCP2221 int. Takt oder ext. Quarz Onboard ES8266 für Internet Anwendungen Alle Pins auf Stiftleisten herausgeführt 6pol. ICSP-Anschluss Lochrasterfeld für Erweiterungen Erstellt wurde die Platine mit TargetV18 in der Distrelec Edition. Hier der Schaltplan
sind noch ein paar unbestückte Platinen übrig. Hier ein Testprogramm um mittels des PIC's und des ESP's einen AT-basierenden Webserver zu realisieren: In der esp8266.h sind eure Zugangsdaten zum Router einzutragen: //wifi connections settings const char ssid[] = "SSIS"; const char passwd[] = "Passwort
-
Article
UHF-Modulator ALPS MDLP3W104A
V-Mikrocontroller herausfordernd werden (siehe unten). Beim Autor funktioniert aktuell ein Wert von 3k3 an einem ESP8266 über einen "2-MOSFET-Levelshifter" und zeigt ausreichend Abstand zu der Low-Schaltschwelle des ESP als auch eine spezifikationsgemäße Anstiegszeit. FIXME Screenshot vom Scope! Besonderheiten bei
und sichergestellt werden, dass der Low-Pegel auf der 3,3 V-Seite im zulässigen Bereich liegt (beim ESP8266: 25% Vsup i.e. ca. 825 mV bei 3,3 V Versorgung), da hierdurch auf der SDA-Leitung das ACK-Bit zurückgesendet wird. Zu niedrige Pull-Up-Widerstände auf der 5 V-Seite(!) bewirken einen zu hohen Pegel
-
Article
IRMP
Board) STM32 mit HAL-Library (NEU!) STM8 STM8S103F3 TI Stellaris LM4F120 Launchpad (ARM Cortex M4) ESP8266 (NEU!) ESP8266-EVB TEENSY 3.0 (NEU!) MK20DX256VLH7 (ARM Cortex-M4 72MHz) MBED (NEU!) LPC1347 Cortex-M3 mit 72 MHz LPC4088 (Embedded Artists) ChibiOS HAL (NEU!) Verschiedene ARM-Cortex-µCs, wie z.B
PIC12F1840 irmp-main-stm32.c - STM32 irmp-main-stellaris-arm.c - TI Stellaris LM4F120 Launchpad irmp-main-esp8266.c - ESP8266 irmp-main-mbed.cpp - MBED examples/Arduino/Arduino.ino - Teensy 3.x irmp-main-chibios.c - ChibiOS Auch auf PIC-Prozessoren ist IRMP lauffähig. Für den PIC-CCS-Compiler sind entsprechende
-
 Image
Image
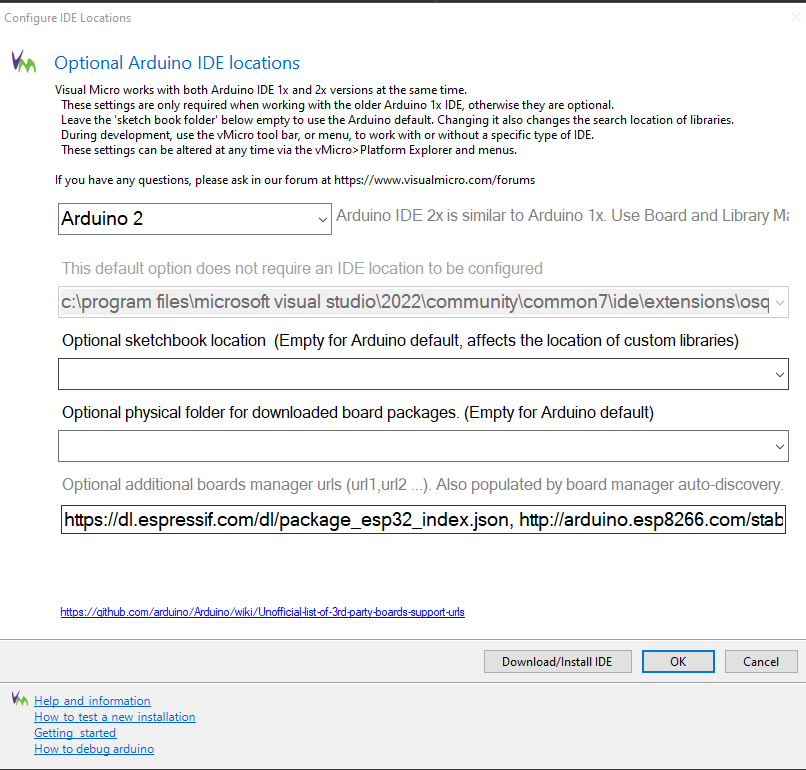
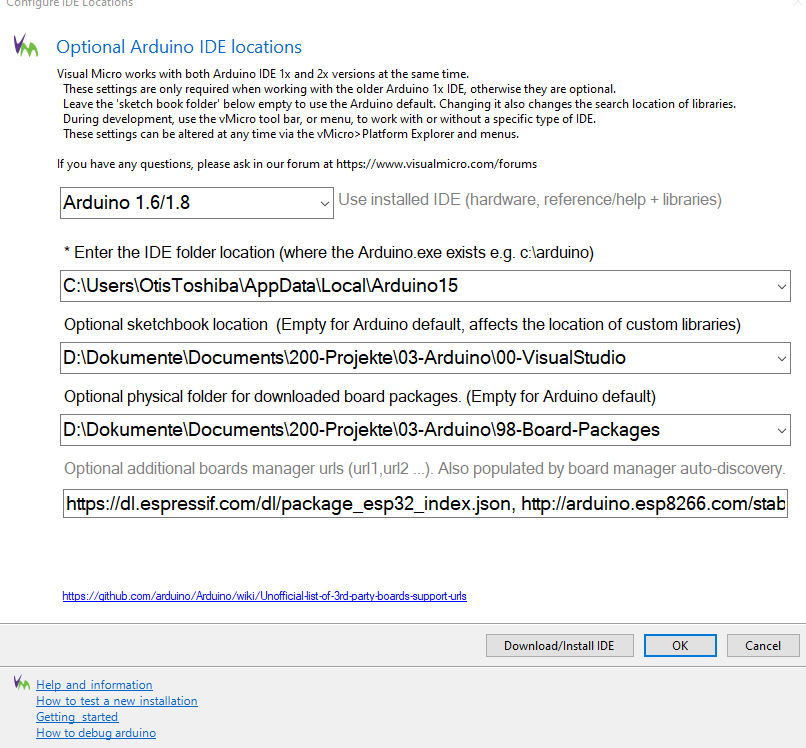
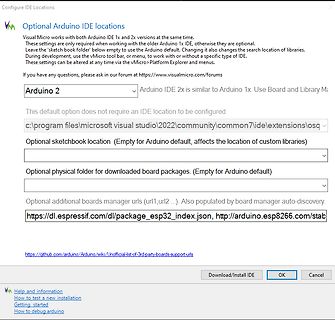
Konfigurationseinstellungen für Arduino IDE in Visual Micro
url1,url2...). Also populated by board manager auto-discovery. https://dl.espressif.com/dl/package_esp32_index.json, http://arduino.esp8266.com/stab Download/Install IDE OK Cancel Help and information How to test a new installation Getting started How to debug arduino
-
 Image
Image
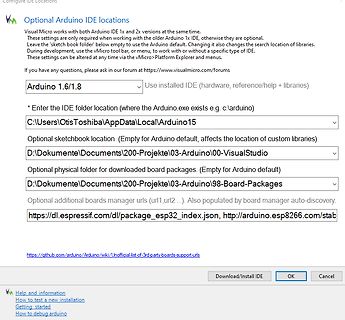
Einstellungen für Arduino IDE Pfade in vMicro
url1, url2 ...). Also populated by board manager auto-discovery. https://dl.espressif.com/dl/package_esp32_index.json, http://arduino.esp8266.com/stab https://github.com/arduino/Arduino/wiki/Unofficial-list-of-3rd-party-boards-support-urls Download/Install IDE OK Cancel Help and information How to test
-
Thread
Hardware-independent µC core?
Hi, the problem: my code wants to run on a couple disparate microcontrollers (ESP8266, "small" STM32, AVR AtMega). Besides the usual digital I/O which e.g. Arduino supports cross-platform I need stuff like port interrupts, timer interrupts, and letting the controller sleep until
-
Article
IRMP - english
Board) STM32 with HAL library (NEW!) STM8 STM8S103F3 TI Stellaris LM4F120 Launchpad (ARM Cortex M4) ESP8266 (NEW!) ESP8266-EVB TEENSY 3.0 MK20DX256VLH7 (ARM Cortex-M4 72MHz) MBED (NEW!) LPC1347 Cortex-M3 72 MHz LPC4088 (Embedded Artists) ChibiOS HAL (NEW!) Various ARM Cortex MCUss, for example STM32,
PIC12F1840 irmp-main-stm32.c - STM32 irmp-main-stellaris-arm.c - TI Stellaris LM4F120 Launchpad irmp-main-esp8266.c - ESP8266 irmp-main-mbed.cpp - MBED examples/Arduino/Arduino.ino - Teensy 3.x irmp-main-chibios.c - ChibiOS IRMP also runs on PIC processors. For the PIC-CCS compiler the necessary preprocessor
-
Article
Giess-o-mat
werden, so ist dieser Beitrag sehr empfehlenswert: Hier gibt es ein Projekt mit einem WeMos D1 Mini 1 / ESP-8266 : Für die Anbindung an einen Arduino gibt es ein fertiges Sketch: Oder gleich ein fertiges Arduino shield: Oszilloskopbilder des originalen Sensorsgnals und dem Signal nach einem Frequenzteilers
mit Raspberry PI und den Gies-O-mat Sensoren realisiert: Ein weiteres schönes Projekt, dass einen ESP32 UND Arduino nano verwendet: Die Software. Ich denke, die Funktionalität ist größtenteils selbsterklärend, wenn man sich den Sourcecode anschaut. Im Wesentlichen besteht sie aus einer Endlosschleife
-
Article
STM8
STM8S103F3P6 Breakout Boards aus China (ca. 0.60 EUR / Stk ), ST-Link wird benötigt (oder alternativ ein ESP8266 mit esp-stlink firmware) Weblinks. STM8-Familie auf der ST-Website Schnellübersicht über STM8-Familie und Starter Kits Evaluation board STM8S-Discovery auf der ST-Website Wiki-Artikel zum STM8S-Discovery
-
Article
Benutzer:Mampf
veröffentlichen. STM32F429 DIY-Board. STM32F429 @ 168MHz 32MB SDRAM I2S Audio-DAC IR (derzeit unbenutzt) WLAN (ESP8266) µSD 2 USB (CDC, zweites Interface nicht benutzt) Software: Helix MP3-Decoder 7 Band (IIR) Equalizer Sagenumwobende Chris Audio Dynamic Compressor (ursprünglich ein Lisp-Audacity-Plugin - nach C
-
Article
Datei:STM32F103-Bootloader.png
Anschluss ESP8266 an BOOT0